If you walk into my Happy Classroom, one of the first things you’ll see is our sound wall. It’s bright, it’s cheerful, and my firstie besties use it every single day. I made every card with my own hand-drawn clipart, so it truly feels like it belongs in our room.
What Is a Sound Wall?
A word wall is sorted by letters. A sound wall is sorted by sounds. Each card shows the sound, the spelling, a picture, and a mouth picture that shows how we make the sound. My kids start with what they hear and say, then connect it to what they read and write.
Our wall is organized into short vowels, consonants, digraphs, hard and soft sounds, and long vowels with all their different spellings.
How We Use It Every Day
Phonics lessons: We point to the card, say the sound, and look at the mouth picture together.
Writing time: When a friend gets stuck on a word, I say “Check the sound wall!” and off they go.
Reading groups: We point to the wall when we meet a new spelling pattern.
Chants and songs: We sing and chant our way through the sounds. My visual and auditory learners love it!
Benefits of Having a Sound Wall
It matches how kids learn to read. Children learn to speak before they read, so starting with sounds just makes sense to them.
It builds independence. Students can find spellings on their own instead of waiting for me.
It connects reading and spelling. Kids see all the ways one sound can be spelled, like long a in rain, hay, and snake.
Mouth pictures support articulation. Students can see and feel how a sound is made, which helps with sounds that are easy to mix up.
It supports every learner. Visual, auditory, and hands-on learners all get what they need, and it’s a big help for English learners too.
It grows with your class. You can add spellings as you teach them, so the wall is never overwhelming.
It turns the room into a teaching tool. A quick glance becomes a mini-lesson all day long.
Easy Print and Prep
I know how busy teachers are! My sound wall is made to be easy: print, cut, and hang. No complicated assembly, and you can add cards as you teach each sound.
Bring a Sound Wall to Your Classroom
If you’d like this sound wall made with my hand-drawn clipart for your own classroom, you can find it in my shop. I’d love to see how you use it in your room!
Hi friends! Tomorrow, November 13th, is World Kindness Day, and it is one of my very favorite days to celebrate in our Happy Classroom. Kindness is something we practice all year long, but I love giving it its own special day so my firstie besties can really stop and think about how their words and actions make other people feel.
Today I’m sharing the book we read, a little chant we say, and a free printable you can use with your own kiddos.
Start with a Book: When I Smile
We kick off the day with When I Smile: A Book of Kindness by Jo Witek, illustrated by Christine Roussey. Just look at that cover! The die-cut rainbow turns into a big happy smile, and my students can’t wait to get their hands on it. The sweet, simple illustrations make it a perfect read-aloud for little learners.
The book’s message is one that first graders understand right away: one small kind act, even a smile, can brighten someone’s whole day and keep on spreading. After we read, I ask a few questions to get them talking:
How do you feel when someone smiles at you?
Who is someone who was kind to you this week?
What is one kind thing you could do today?
Make a Kindness Anchor Chart
Next, we brainstorm a big list of ways to be kind, and I write every idea on chart paper. My firsties come up with the sweetest ideas, like sharing crayons, inviting a friend to play at recess, saying “thank you,” helping clean up, and giving a hug. I add a quick picture next to each one so all of my readers can use the chart during writing time.
Say It Together: Our Kindness Chant
You know I love a good chant! It helps my visual and auditory learners remember the big idea, and it gets everyone’s wiggles out. We say this one with a clap on every beat:
Kind hands help, Kind words cheer, A kind smile shows That I care you’re here! Big or small, Near or far, Kindness makes us Who we are!
Write and Color: I Can Be Kind By…
To wrap it all up, students complete this World Kindness Day page. It has a boy and girl hugging a heart-shaped Earth to color, plus the sentence starter I can be kind by… and primary writing lines.
Use the anchor chart. Students can pick an idea from our chart and copy the words they need.
Stretch the sentence. Challenge writers who are ready to add a “because” or a second kind idea.
Share and celebrate. Friends read their pages aloud on the carpet, and we cheer for every kind idea.
Make a display. These look so happy hanging in the hallway with a title like “Kindness Makes Our World Happy!”
Grab It for Free!
I would love for your students to celebrate too! The World Kindness Day printable is waiting for you in my Happy Teacher Free Resources Google Drive. Print, write, color, and spread a little kindness!
Hello, happy teacher friends! Thanksgiving is almost here, and nothing gets my firstie loves more excited than a snack they get to build themselves. Pumpkin Pie Cups are one of my very favorite fall snacktivities. They’re no-bake, super simple, and the perfect hands-on way to practice sequencing and how-to writing. Plus, they taste like pumpkin pie in a cup!
Why I Love a Snacktivity
A snacktivity is a snack plus an activity, and it’s pure magic in first grade. When kids build something step by step with their own hands, they remember the steps. That makes writing about it so much easier. They can see it, touch it, smell it, and taste it, which is a big win for every kind of learner in the room.
What You Need
Clear plastic cups: I use 9 oz Chinet Crystal cups. They come 50 to a bag, so there’s plenty for the whole class. Clear cups let your firsties see all those yummy layers!
Graham crackers: Honey Maid grahams are my go-to.
Pumpkin pie filling: Libby’s Easy Pumpkin Pie Mix. It’s already sweetened and spiced, so it tastes like pumpkin pie straight from the can. No mixing needed!
Vanilla pudding: Snack Pack vanilla pudding cups. Each firstie gets their own little cup to spoon into their snack.
Whipped cream: a can of Great Value Extra Creamy whipped topping.
Sprinkles (optional): a fun finishing touch! We used Great Value Salted Caramel Hot Cocoa Topper, and my firsties loved it.
Spoons and zip-top bags for crushing the crackers.
My Pumpkin Pie Cups writing page (free! The link is below.)
For a class of about 20–25, I plan on one big 30 oz can of pumpkin pie mix, a bag of cups, a box of grahams, one pudding cup per student (they come 4 to a pack, so 6 or 7 packs), one can of whipped cream, and a jar of sprinkles.
How to Make Pumpkin Pie Cups
First, put a graham cracker in a zip-top bag and crush it into crumbs. Pour the crumbs into the bottom of your cup. (This is always their favorite part!)
Next, spoon the pumpkin filling on top of the crumbs.
Then, add a layer of vanilla pudding.
Finally, top it with a swirl of whipped cream and a shake of sprinkles. I handle the whipped cream can myself, and the squeals are worth it!
Last, grab a spoon and enjoy!
We like to say this little chant as we build: “First, next, then, finally, last, making pumpkin pie is a blast!”
Write About It
Right after snack, while every step is fresh, we write! The Pumpkin Pie Cups writing page is made for my firsties:
Draw yourself: The kiddo holding the cup has a blank face, so each child draws their own face. They love this!
Picture word bank: graham crackers, pumpkin filling, vanilla pudding, and whipped cream, each with a picture to help with spelling.
Sequence words: First, Next, Then, Finally, and Last are printed right on the page with primary writing lines.
Need to differentiate? Some friends can write one word per step from the word bank, while strong writers can add describing words like crunchy, creamy, and yummy.
Grab Your Free Writing Page
You can find the Pumpkin Pie Cups writing page in my Happy Teacher Free Resources Drive. Download it, print, and you’re ready for a happy fall snack day!
Hi friends! Today I want to share one of my firstie besties’ very favorite things in our Happy Classroom… class coupons! They are simple, they cost me nothing, and they have made a huge difference in how much reading happens at home.
How My Students Earn a Coupon
Every month, each child gets a Happy Hearts Reading Log. It has 20 numbered lines with a spot for a parent signature and the minutes read. When a student fills in all 20 entries by the end of the month, they earn a class coupon of their choice!
Here’s my little trick for keeping it all together: I copy the reading log on the back of my monthly newsletter. Families get the month’s learning, important dates, and the reading log all on one page. Students keep it in their homework folders, so it travels back and forth every day and never gets lost in a backpack.
I also add a reminder right on the front of the newsletter: 20 Reading Logs this month = a class coupon. Parents see it, kids see it, and everyone knows the goal.
Meet the Coupons
Every coupon is something my kids truly love, and none of them cost a thing. Here’s what they can choose from:
Eat Lunch with My Teacher
This one is always a top pick! The student gets to eat lunch with me in the classroom, and they get to bring a friend. It’s such a sweet time to just chat and get to know them a little better.
Fancy Pencil
Students get to pick a special pencil to use. It’s amazing how a little sparkle makes handwriting practice feel extra special!
No Shoes Day
Shoes off, cozy socks on! Students can go shoeless in the classroom for the day.
Show and Tell
Students bring something special from home to share with the class. Bonus: it’s great speaking and listening practice!
Stuffy Day
A favorite stuffed animal gets to come to school for the day and be a reading buddy.
Work on the Rug All Day
Firsties love a change of scenery! With a clipboard in hand, they can do their work stretched out on the rug instead of at their seat.
Work in the Tent All Day
The coziest seat in the room! Students get to set up in our classroom tent and work there all day.
Tips for Using Class Coupons
Print and cut ahead of time. The coupons print four to a page, so I run off a stack and keep them ready to go in a pretty box.
Let students choose. Having a choice makes the reward feel even more special.
Celebrate together. When reading logs come in at the end of the month, we celebrate every child who reached 20 entries.
Keep families in the loop. A quick reminder in the newsletter helps parents cheer their reader on all month long.
Grab Them for Free!
I would love for your students to enjoy these too! The class coupons are waiting for you in my Happy Teacher Free Resources Google Drive. Print, learn, and enjoy!
If you’ve ever handed the same spelling list to a whole class of firsties, you know how it goes. A few of your firstie loves are bored, a few are in tears, and the ones in the middle are just hanging on. After 34 years in first grade, I can tell you one list for everyone just doesn’t work. That’s why my firstie besties do spelling in small, differentiated groups, and why I created my Happy Hearts Spelling Word Sorts to make it simple to run every single week.
Here’s exactly how it works in my Happy Classroom.
Step 1: Assess and Find the First Missing Skill
Everything starts with the Spelling Inventory, a quick placement assessment included in my Happy Hearts Spelling Word Sorts. I’m not looking for a score. I’m looking for the first skill each child hasn’t mastered yet, and that’s where they start. If a child can spell short vowel words but misses digraphs, digraphs is their group. Simple as that.
Right now my groups look like this:
CVC short vowels: 8 students
Digraphs: 11 students
Magic e: 4 students
Vowel teams: 1 student
Yes, one friend is in a group all by herself, and that’s okay! That’s the beauty of differentiating. Every child is working right where they need to be, and nobody is waiting on anybody else.
Step 2: Follow the Same Weekly Routine
The skills are different, but the routine is the same for everyone. That’s my secret to keeping it manageable. Once my firsties learn the routine, they can run it on their own, no matter which group they’re in. Each sort has its header words, its pattern words, and a couple of heart words (colored pink!) to practice too.
Monday: Learn It, Color It, Cut It
We learn the new skill together. One copy of the words goes home in our homework folder so families can practice too. Then students color their header words, cut apart their word cards, sort them, and put their initials on the back of each card (trust me, this saves so many “that’s mine!” moments). Everything gets stored in a ziplock baggy stapled to the inside cover of their spelling journal, so the words are always right where they need them.
Tuesday: Sort and Write
Students pull out their cards, sort them again, and write the words on the next clean page in their spelling journal. Sorting every day is where the magic happens. They’re not memorizing a list, they’re noticing the pattern.
Wednesday: Sort, Color, Type, Write
This is a class favorite! After sorting, students color the vowels red on their paper keyboard page, then practice typing their words and writing them on the lines below. It’s spelling practice and keyboarding practice in one, and those red vowels give extra visual support for finding the vowel in every word.
Thursday: Sort and Glue
One last sort, and this time it’s for keeps! Students glue their word cards on the next clean page in their journal under the correct headers. These pages make the sweetest record of growth to look back on.
Friday: Whiteboard Practice and Test
On Friday, students write their words on their whiteboards to warm up for their spelling test. Look at those proud faces! They draw their own columns and sort from memory, which shows me they really understand the pattern.
Step 3: Re-Assess and Regroup
After 5 to 6 weeks, I give the assessment again and regroup students based on their progress and mastery. Some firsties are ready to move up to the next skill, and some need a little more time with the same one. Groups are never set in stone. They change as my students grow, and that’s exactly what I want.
Why I Love It
Every child is working at their level. No more one-size-fits-all lists.
The routine runs itself. Same steps every day, so students know just what to do.
Lots of hands-on practice. Coloring, cutting, sorting, typing, writing, and gluing keep little hands busy and engaged.
Families stay in the loop with a copy of the words in the homework folder.
The pattern sticks. Sorting every day helps students see how words work, not just memorize them.
Grab My Happy Hearts Spelling Word Sorts
If you’d like to try differentiated spelling groups in your classroom, my Happy Hearts Spelling Word Sorts have everything you need to get started:
103 weekly word sorts to use in class and for homework
Spelling Inventory Checklist for your placement assessment
2 weekly spelling sort pages for gluing words under their headers
2 weekly spelling test forms, with spots for heart words and a sentence
2 progress monitor pages and a weekly assessment page for non-sorting skills
There are lots of options, so you can pick and choose what works best for your students!
Digraphs can feel like magic tricks to our littles: two letters team up and make one brand-new sound! In my Happy Classroom, I wanted my firstie loves to see, hear, and feel each digraph, so I created a set of Digraph Friends to help them do just that.
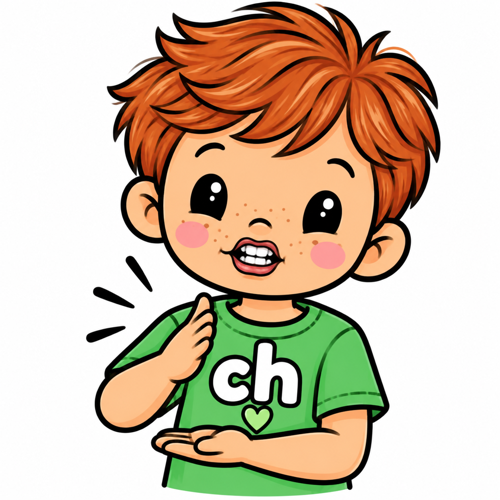
Each friend wears their digraph right on their shirt and shows a simple mouth shape and hand motion for the sound. After 34 years in first grade, I can tell you that a sound paired with a picture and a movement sticks so much better than a flashcard alone. These friends support my visual learners, my auditory learners, and my wiggly kinesthetic learners all at once!
Meet the Digraph Friends
Here’s each friend with the chant and motion we use. Feel free to tweak the motions to match your phonics program!
ch: Chop
Chant: Ch /ch/ /ch/ chop
Motion: Chop one hand down onto the other.
th (Unvoiced): Think
Chant: Th /th/ /th/ think
Motion: Tap a finger on your forehead and think.
th (Voiced): This
Chant: Th /th/ /th/ this
Motion: Point to your open hand: “this one!”
sh: Shhhh
Chant: Sh /sh/ /sh/ shhhh
Motion: Finger to your lips.
wh: Whisk
Chant: Wh /wh/ /wh/ whisk
Motion: Whisk the air like you’re stirring a bowl.
wr: Wrist
Chant: Wr /wr/ /wr/ wrist
Motion: Point to your wrist.
ph: Phone
Chant: Ph /f/ /f/ phone
Motion: Make a phone with your hand by your ear.
The little action lines around each friend remind kids that this sound comes with a move. My firsties love noticing the details, like the whisk and mixing bowl or the phone hand!
How We Use Them in Our Happy Classroom
We practice the sounds and motions every single day, and it only takes a few minutes.
Introduce one friend at a time. I hold up the card, we notice the letters on the shirt, and we talk about what the friend is doing with their mouth and hands.
See it, say it, move it. We say the sound together while doing the motion. Then we say a few words that start with it: ship, shell, shoe!
Quick daily review. I flash the cards and my firstie besties shout the sound and do the motion. It’s a perfect brain break between lessons.
Use them during reading and writing. When a friend gets stuck on a word, I just do the motion. Nine times out of ten, they remember the sound right away!
The friends also look adorable on a phonics sound wall, so kids can glance up and find them anytime.
Games We Love to Play
Once the motions are familiar, the fun really starts. Here are a few class favorites:
Lightning Flash: I flash the Digraph Friends up quickly, and the kids make each sound as fast as they can. They love trying to beat me!
Silent Motion Guess: I do a motion without a sound, and the class whispers the digraph.
Digraph Freeze Dance: Play music, stop it, and hold up a friend. Everyone freezes in that friend’s motion!
Which Friend Am I? I say a word like chick or wrist, and kids show me which friend it belongs to with the motion.
Hide and Seek: Hide the cards around the room. When a friend is found, the class says the sound and names a word.
Sort It Out: Kids sort picture cards under the right Digraph Friend in a pocket chart or at a center.
These games keep everyone moving, laughing, and practicing without even realizing it. That’s my favorite kind of learning!
Grab Your Free Digraph Friends
I created these friends with love, and I’d be so happy for them to visit your classroom too! You’ll find them in my Happy Teacher Free Resources Drive.
If you use them with your kiddos, I’d love to see! Tag me on Instagram @victoria_saied or TikTok @victoriasaied so I can cheer you on.
Hello, friends! November is one of my very favorite months in our Happy Classroom. The leaves are crunching, the turkeys are strutting, and my firstie loves are finally starting to feel like real readers. There is nothing sweeter than watching a little one point to each word and read a whole book all by themselves!
That’s exactly why I made my November Print-N-Go Emergent Readers. They’re simple, sweet, and ready when you are.
What’s Inside
You get four seasonal mini-books, all created by me:
Turkey Facts: “This is a turkey.” Did you know turkeys have 5,000–6,000 feathers? My firsties’ eyes get SO big on that page!
All About Owls: a perfect fit for a fall nocturnal animals unit.
Veteran’s Day: a gentle, kid-friendly way to talk about honoring our veterans on November 11th.
We Give Thanks: Thanksgiving is on the 4th Thursday in November, and this one leads right into gratitude chats.
Why Little Readers Love Them
Tracking dots under every word. Students touch each dot as they read, which builds one-to-one correspondence and confidence.
A simple, clear font that’s easy for brand-new readers.
Repetitive, predictable sentences so kiddos can be successful right away.
Black-and-white pages to color, because firsties love making a book their own!
Easy Prep for Busy Teachers
Each book is 8 pages, including the cover. Just print, copy (double-sided if you’d like!), cut on the dotted line, and staple. That’s it! I love using them in guided reading, at a center, for morning work, or tucked into book boxes. They also make wonderful take-home readers for practicing with families.
Want a Whole Year of Readers?
If you love these, you’ll love my Emergent Readers: A Growing Bundle! It includes four readers for every month from September through May, which is 36 little books in all! Apples, bats, penguins, Earth Day, and so much more.
The bundle is $20 (a $48 value), so you save big and you’re set for the whole school year. And if you already own any of my monthly packs, they’re already in there!
Every October, one of my favorite read-alouds comes off the shelf: Spookley the Square Pumpkin by Joe Troiano. My firstie loves adore this sweet story, and this year we finished it with a snack that was almost too cute to eat. Almost! 🎃
We Read the Story
Spookley lives in a pumpkin patch full of round pumpkins, but he’s square. The other pumpkins tease him for being different. Then a big storm blows through, and Spookley’s square shape turns out to be exactly what saves the day.
Talking About the Message
After reading, we gathered on the carpet and talked about the big idea: Don’t judge a book by its cover. We talked about how Spookley looked different on the outside, but that didn’t change how wonderful he was on the inside.
Then we talked about our own Happy Classroom. Every one of us is special and unique in our own way, and our differences make our class family stronger. My firsties had the sweetest things to say about what makes them (and their friends!) one of a kind. 💛
Retelling the Story
Next, we completed our story elements retelling page. Students wrote the title, then filled in:
Characters: who was in the story
Setting: where the story took place
Plot: what happened in the beginning, middle, and end
This page is a great way to check comprehension. And my little pumpkin buddy in the corner makes it a little extra fun!
Making Our Square Pumpkin Snacks
Now for the yummy part! Here’s everything you need:
Honey Maid graham crackers
Orange cookie icing (I used Great Value pouches)
Tootsie Rolls for the stems
Twizzlers Pull ‘n’ Peel for the smiles
Candy eyes
Paper plates and plastic spoons
How we made them:
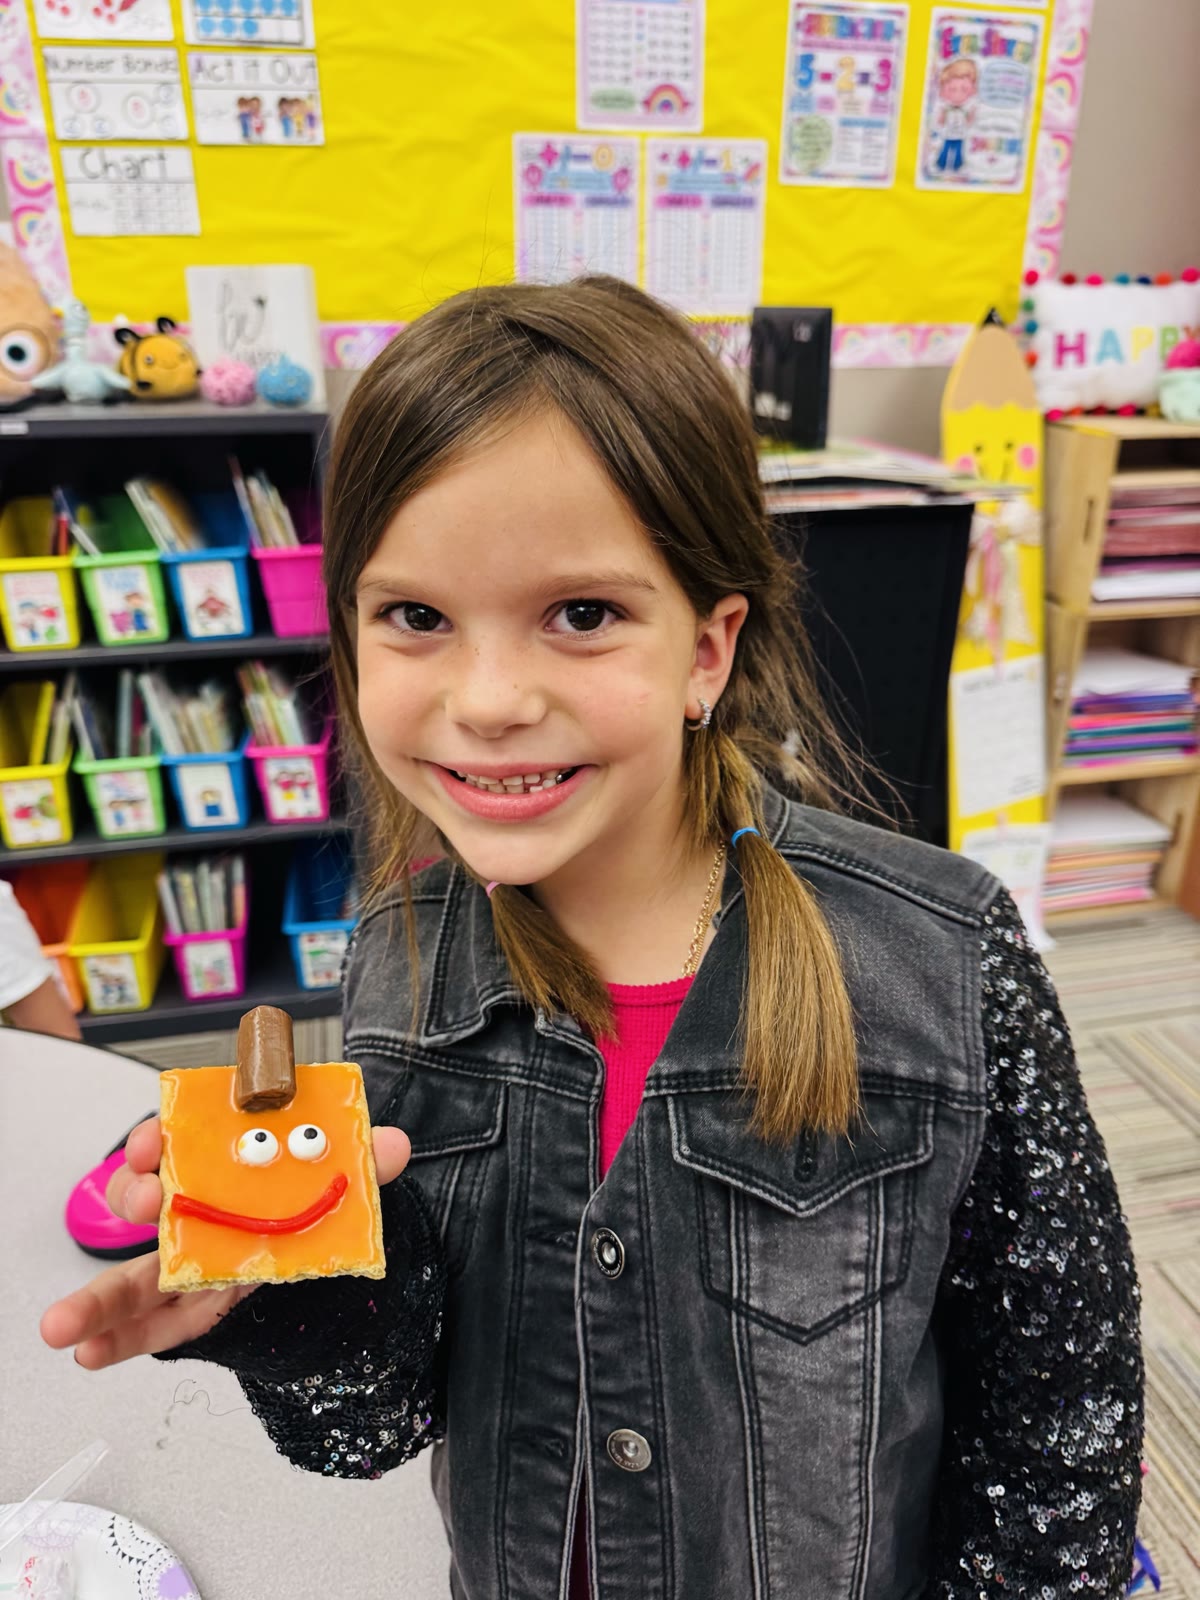
Break a graham cracker in half to make a square. Just like Spookley!
Spread orange icing all over the top with a spoon.
Press a Tootsie Roll piece at the top for the stem.
Add two candy eyes.
Peel off one strand of Twizzler, cut into smaller pieces, and curve it into a big smile.
Watch my firsties in action!
Every single pumpkin came out a little different, with silly eyes, crooked smiles, and tilted stems. That was the perfect reminder of our lesson: no two pumpkins are the same, and that’s what makes them special!
After we gobbled up our snacks, we snuggled in and watched the adorable Spookley the Square Pumpkin movie. My firsties loved seeing Spookley come to life on the big screen, and they cheered when he saved the pumpkin patch! It was the perfect way to wrap up our day. 🎃
Teacher Tips
Squeeze the icing onto each plate before the kids start. Spreading it with a spoon is much easier for little hands.
Check your class’s food allergies and your school’s snack guidelines before you shop.
Grab the Free Printables
Want to try this with your own firsties? The retelling page is part of my A Little Square Pumpkin Story Freebie on TPT, and it’s free! You’ll get 5 reading response printables to pair with the story:
Story Retelling: characters, setting, and beginning, middle, and end
Nouns and Verbs Sort: cut-and-paste picture word cards
Problem and Solution: a sad pumpkin and a happy pumpkin to show what went wrong and how it was fixed
Friendly Letter: students write a letter to (or from!) the little square pumpkin
Directed Drawing: 8 easy steps to draw your own square pumpkin
Hello, friends! If you teach little learners, you know that heart words can be some of the trickiest words for our readers to master. Words like said, was, and of just don’t play fair! Today I’m sharing how I use my Happy Heart Word Rhymes in my first grade classroom to make those tricky words fun, memorable, and full of giggles.
Why I Created My Heart Word Rhymes Bundle
I wrote these rhymes to help my students remember the tricky parts of heart words “by heart.” I wanted to give them a cute poster and a fun rhyme to support my visual and auditory learners. Poems, chants, visuals, and songs have always been something I love to bring into my lessons. They make learning fun and engaging, and they help new words stick!
How I Use Heart Word Rhymes in My First Grade Classroom
When a new heart word comes up in our UFLI lessons, I pull out its rhyme poster. Here’s the simple routine we follow:
Introduce the poster. We look at the word together and notice the tricky part in red.
Echo read. I read a line, and my firsties echo it back to me.
Add a pat-clap beat. We pat our legs and clap our hands to the rhythm of the rhyme. This is where the giggles start!
Read and pat-clap together. Now we put it all together and say the whole rhyme as a class with our beat.
We don’t read a rhyme just once. We come back to it over several days. Each time we read it, my students get more confident and the tricky part sticks a little better. Before long, they’re chanting it on their own!
Making Tricky Words Memorable
Every poster follows the same happy pattern, so students always know what to do:
The tricky part is red, with a little heart underneath, so students can see exactly which part to learn by heart.
The rhyme spells the word twice, like “s-a-i-d, s-a-i-d,” so students hear and say every letter.
Rhythm and rhyme make the words easy to chant and hard to forget.
A cute picture connects to the rhyme, giving students something to picture in their minds.
A simple sentence at the bottom lets them read the word in context.
Ideas for Using the Bundle
Whole-group lessons: Introduce new heart words with the routine above.
Small groups: Revisit the rhymes with readers who need a little extra practice.
Literacy centers: Let students read the rhymes with a partner and a pointer.
Extra practice: Hang the posters near your word wall and chant a few during morning meeting or while lining up.
A Peek Inside the Bundle
Here are a few favorite rhymes from my classroom:
the: “t-h-e, t-h-e, That’s the key, Come and spell the with me!”
said: “s-a-i-d, s-a-i-d, ‘It’s time for bed,’ The little girl said.”
do: “d-o, d-o, Dribble, shoot, Woo-hoo! I know Just what to do.”
of: “o-f, o-f, Lots of apples for you and me, o-f spells of, you see!”
look: “l-o-o-k, l-o-o-k, Look at the Pink pig, he will Dance a little jig.”
was: “w-a-s, w-a-s, A frog was Sitting on a log. He was in the bog.”
the, said, to, do, of, see, me, from, look, are, was, and you
Where to Find the Bundle
My Happy Heart Word Rhymes are a growing bundle, so when you grab it, you get every new poster I add for free. It’s perfect for Kindergarten, first grade, and second grade classrooms.
I hope these rhymes bring as many smiles and “aha!” moments to your classroom as they do to mine. If you try them, tag me on Instagram. I would love to see your little ones pat-clapping along!
Hello, friends! It has been a while, and I am so happy to be back blogging here at Teaching Happy Hearts! This is my 34th year teaching first grade, and I still love sharing the little things that make our Happy Classroom such a fun place to learn. What better way to start again than with a free October craft?
A Craft We Make Every Single Year
I created this Room on the Broom craft back in 2016, and my firstie loves have made it every October since. It is one of those activities they talk about all year long!
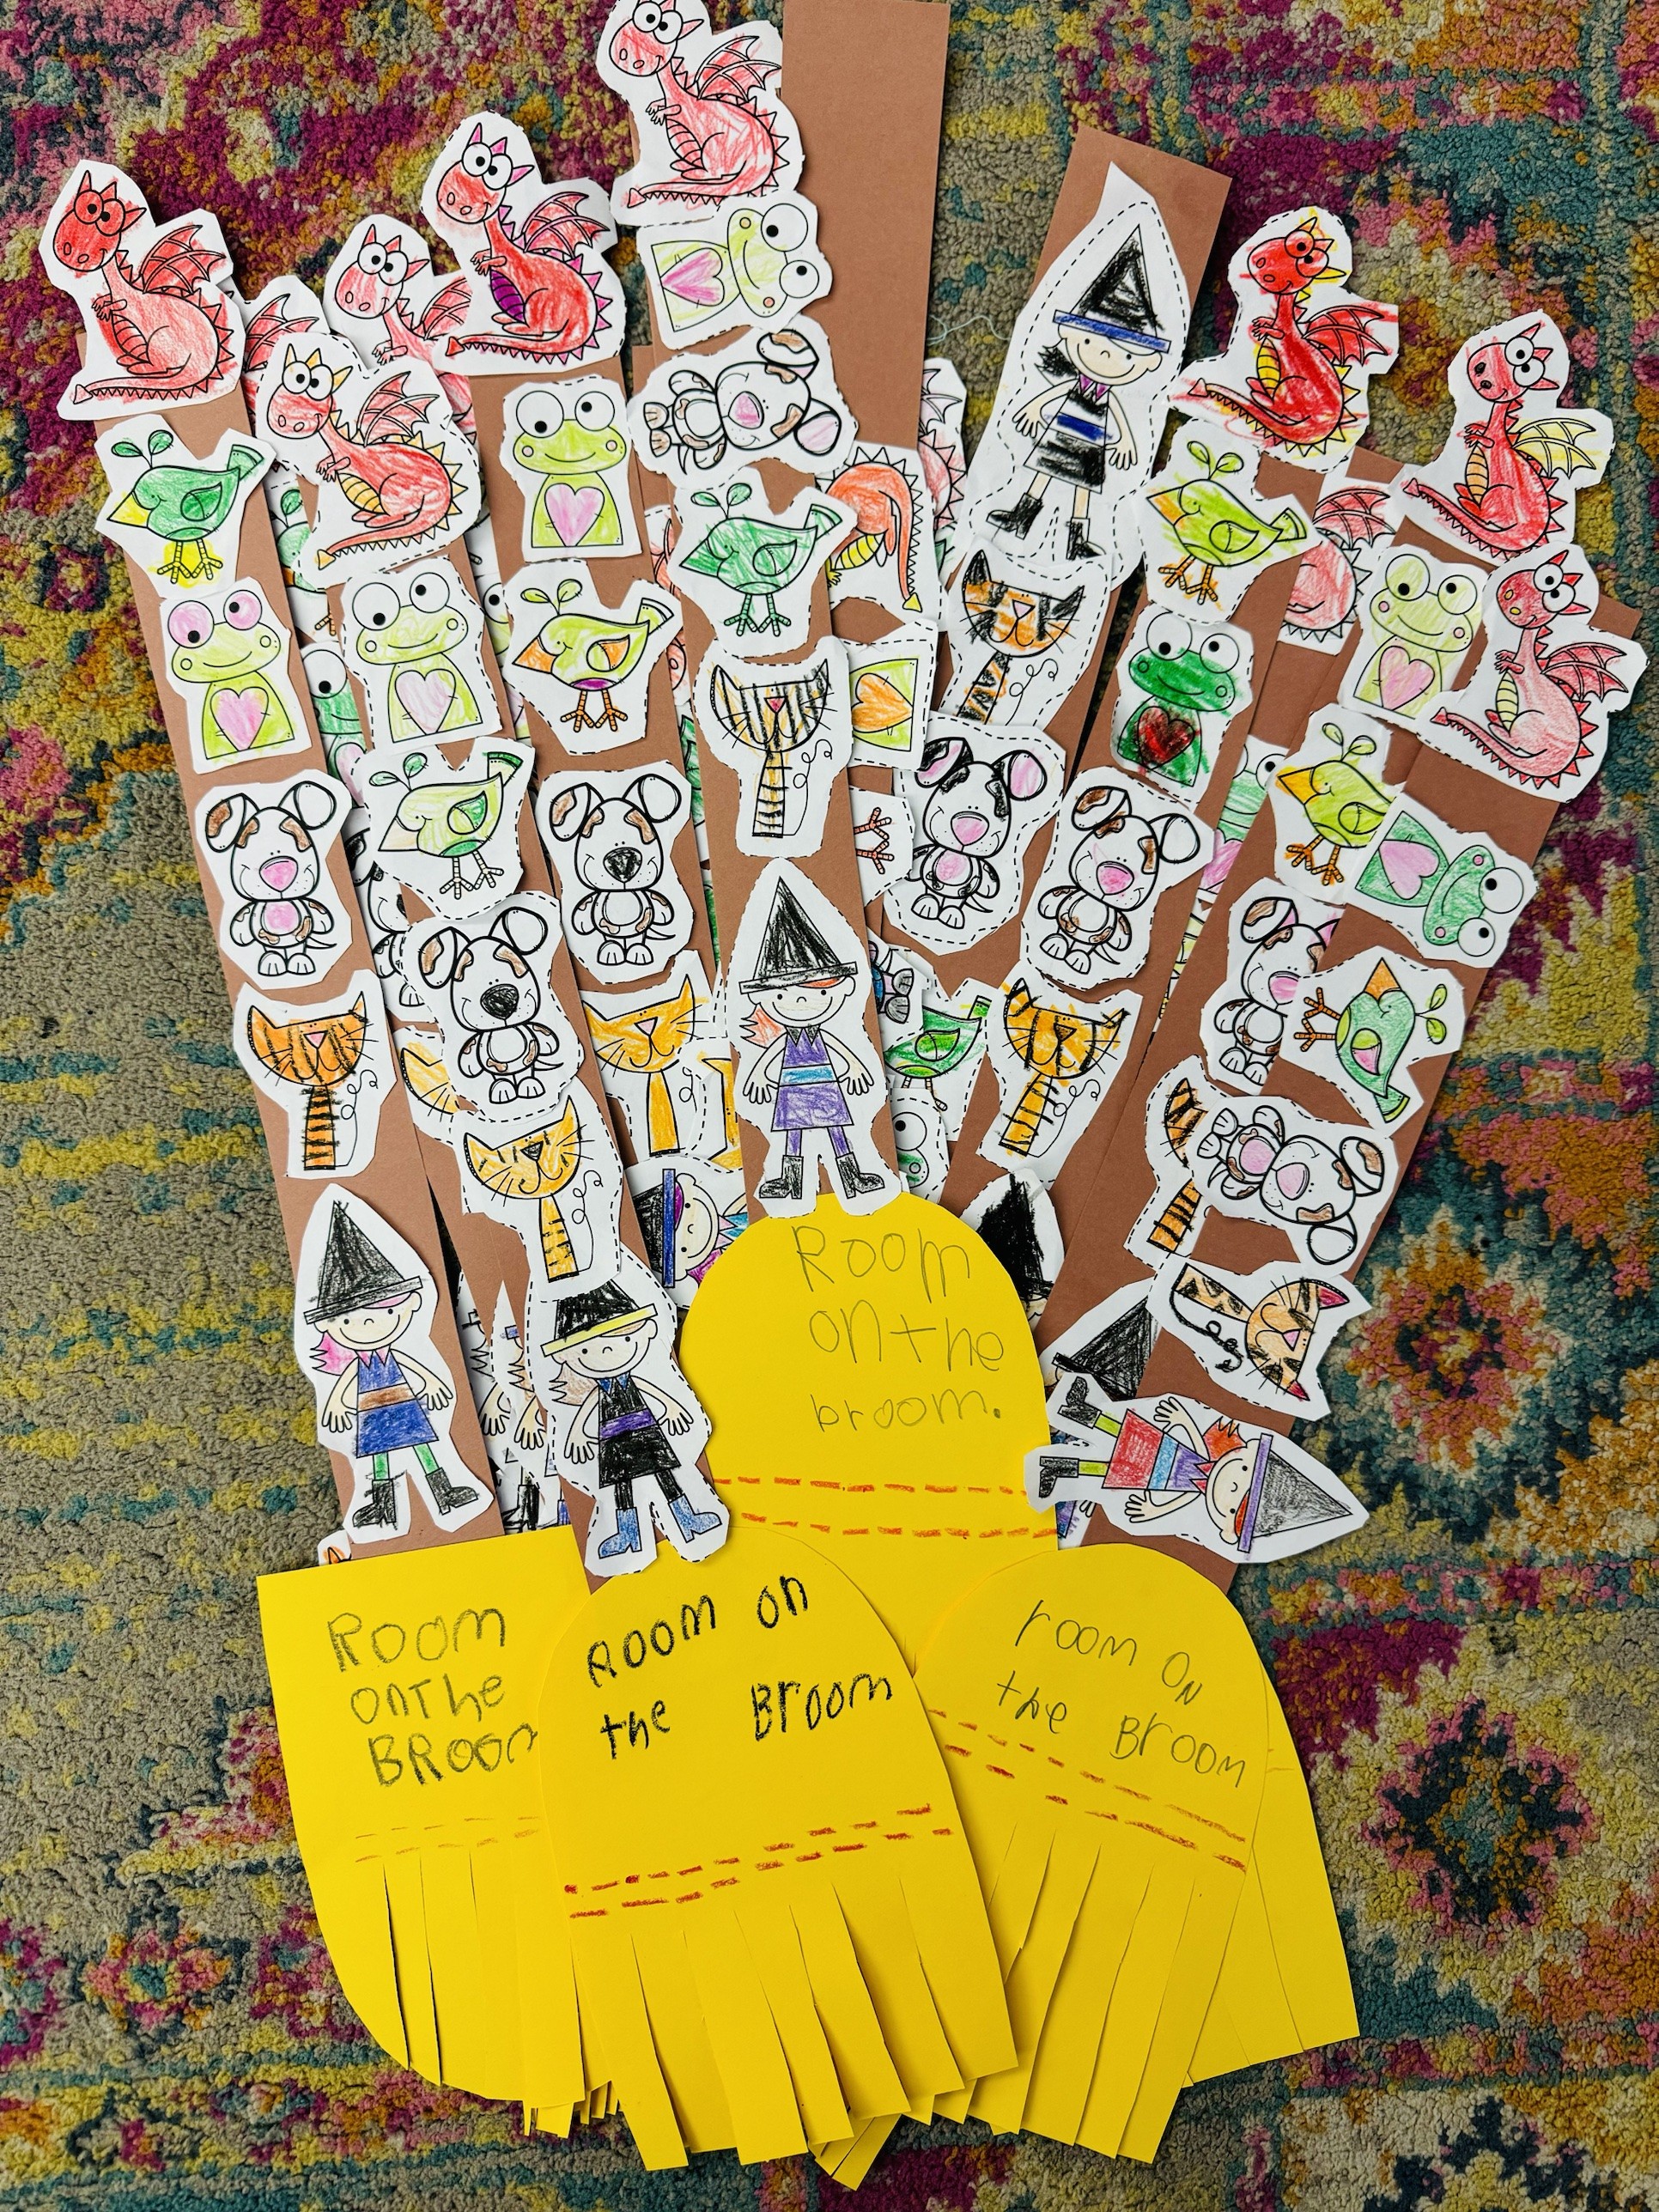
Our happy brooms this year!
Grab the free craft on TPT!
How We Use It in Our Classroom
Read the book. We read Room on the Broom together and enjoy all the rhyming fun.
Talk about the story. We discuss the sequence of the story and all the characters who hop on the broom.
Act it out. My firsties take turns being the witch and her animal friends. There is lots of giggling!
Make the craft. Everyone colors and cuts out the witch, cat, dog, bird, frog, and dragon, glues them on a brown broom handle, and writes the title on the yellow bristles.
Watch the movie. We end with the movie as a special treat.
Grab Your Free Craft
This craft is perfect for Kindergarten and first grade, and it is completely free in my TPT store. I hope your students love it as much as mine do!